Monday, August 31, 2009

Sunday Morning Sticky Rolls


Hey there everyone, as you can tell my post are not frequent since vacation. I started my 4 yr. old in preschool and I am becoming adjusted to a new schedule. I love writing and cooking about food....I will get back in the swing of things..I promise.
NOW! Lets talk about these amazing sticky buns. You will never guess where I found this recipe! Are you guessing? Out of a novel!!! Yep!! Crazy, I know. I am reading a book called Handle With Care by Jodi Picoult. (She is the auther of My Sisters Keeper) The book is wonderful and one of the characters is a Pastry Chef. She has recipes throughout the book that I can't wait to try. These sticky rolls turned out incredible.


The Recipe for The Sunday Morning Sticky Rolls:


Dough:

3 1/4 cp. AP flour
1/3 cp. sugar
1 tsp. salt
2 packages of dry yeast
1 cp. of heated milk
1 egg
1/3 stick of butter, soft

CARAMEL:


1 stick of unsalted butter
3/4 cp. of brown sugar
1/4 cp. light corn syrup


3/4 cp. Pecans

2 TB butter, soft


FILLING:
1/2 cp. chopped Pecans
2 TB sugar
2 TB b. sugar
1 tsp. cinnamon


1. I added all the ingredients for the dough in my food processor and processed until it formed a ball. I removed it and kneaded for 5 minutes. Set in greased bowl for 1 1/2 hours

2. While I waited. I made the caramel. I added the butter and brown sugar and brought it to a boil. I continued to stir. I removed it from the burner when it began a rapid boil. I added the corn syrup. Then, poured it into a 9x13 pan. Sprinkile the whole pecans on top of the caramel sauce.


3. When the dough was ready I punched it down. I rolled it out into a 15 by 10 inches. I smeared the butter all over and then sprinkled with the filling. I rolled it like a jelly roll. Cut it into 8 equal slices. Refridge for 12 hours. (I make the night before)


4. In the morning through it in the oven...35 minutes on 350.


THESE ARE INCREDIBLE!!!

Tuesday, August 25, 2009

Pasta Extravaganza

I have been gone enjoying myself without the hubby. I had to make it up to him and meatballs are his favorite. But I decided to recreate on of my favorite dishes for my kids.

When I first moved to FL three years ago the first restaurant I adventured was Giovanni's. Wow. It is a family owned Italian restaurant with amazing pasta dishes and pizza. Anyway, I ordered a Tortellini Giovanni. Which is a pasta dish with Tortellini with a Alfredo and marinara dish mix. It is now an all time favorite dish. I tried to recreate for my kiddos. I believe it was pretty successful. My kiddos devoured it and the husband loved it too.

Enjoy.

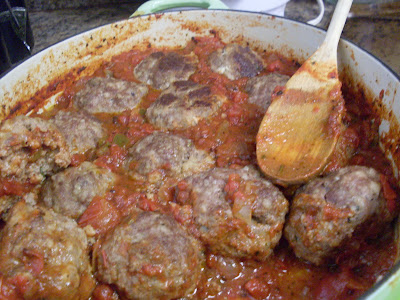
MEATBALLS

The meatballs are a variation of what my mom made on vacation. She added sausage to the mix and it was so good.
Here we go:


1.5 lbs of ground beef
1 lb of sausage, mild
1 egg
1/2 cp. milk
1 1/4 cp. planko bread crumbs
3 garlic cloves, grated
1/2 cp. parm cheese
2 TB. Italian seasoning
1 tsp. salt
1/2 tsp. pepper

Mix until combined. Do not over mix. Form into balls and bake on 350 for about 20 minutes.


My Easy Marinara Sauce:

2 TB olive oil
1 Vidalia Onion, diced
1 Green Pepper, diced
5 cans of Fire Roasted Dice Tomatoes
3 TB Italian Seasoning, No salt
1 tsp. Salt
1 tsp. Pepper
1/2 tsp. Crushed red pepper
1 tsp. sugar

1. Add the oil to a pan and add the onions and peppers. Cook a few minutes. Add the tomatoes and seasonings. I cooked this sauce without a lid all day. It was thick and flavorful.


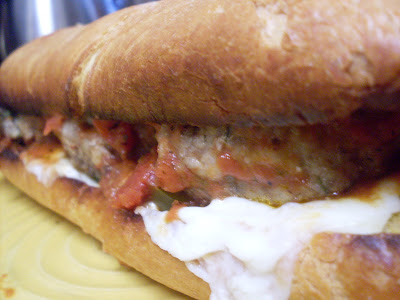
The Sub:
1 sm. loaf of garlic bread
3-6 slices of mozzarella cheese
3 meatballs with a little of the sauce

1. I added the garlic bread and opened it. I added the cheese and broiled until the cheese was browned. I added the meatballs and closed the sandwich. Yum.

MY TORTELLINI GIOVANNI RECREATION


lb of Tortellini
1 stick of butter
8 oz. of Cream Cheese
1 cp. grated parm
1 cp. milk
1 cp. marinara sauce
1 cp. mozzarella

1. Boil the pasta.
2. Melt the butter and whisk in the cream cheese. Add the milk slowly and toss in the parm cheese and mozzarella (let melt). Add the one cup of marinara sauce. Let cook.
3. Add the tortellini to the sauce and cook.

EAT!!!!!

Honestly, one of the best pasta dishes ever. It may not be the best for ya, but well worth it!!!

Monday, August 24, 2009

I am Back!!!

Hello to all of my faithful followers.

I am finally home from an amazing vacation with my family. It was wonderful and relaxing.

Now, I have returned and will be jumping into more creative food and recipes for everyone. I want to thank all of my AMAZING guest bloggers. It is easy to see why I follow these amazing blogs. I am very pleased with each and every recipe. Thank you Thank you!!!


Today is a very important day. It is my four yr. old, Alexandra's first day of Preschool. It is a little emotional. How time flies.....


I miss everyone and I will be by to visit every ones sites and back on track!

Here is some of my vaca pics:


This is my twin sisters, Marci, little boy and Alex. They were inseparable the entire time.


This is my mom and Bailey. She would sit with my mom on her chair and sing songs.


My dad built a Komodo Dragon out of sand for the kids. Needless to say, it was a huge hit on the beach.


Bay with the dragon. She kept calling it an alligator. It does look a little like an alligator. LOL.


Bailey sleeping on the beach. The waves would put her asleep very easily.


All of these pictures where taken at Kitty Hawks Sand Dunes. It was so much fun. The kids loved running down these huge mounds of sand.


Alexandra posing on the dunes.


This is my twin sister holding Bailey Leland.


My Bailey loved the dunes. She jumped right in the sand with a huge grin.


I love this picture. I managed to capture a great picture of Bailey with the Bay and Sunset in the background. Bay and the Bay. LOL.


My Alexandra posing.


The sand dunes and Bay


Look at all the people on top of that massive dune. The kids ran down this dune. It was such a blast.
I will see everyone soon.

Saturday, August 22, 2009

Homemade Nutella


Hi! My name is Diana Bauman from A Little Bit of Spain in Iowa. I am so happy to be guest blogging for Miranda. Thanks so much Miranda, for thinking of me :) When Miranda asked me to be a guest blogger, I wanted to share a recipe that captures the heart and essence of mother and children. CHOCOLATE... NUTELLA!!!! I remember reading not so long ago that Miranda had recently bought her first jar of Nutella... gasp... I know!! I was shocked and excited for her all at the same time. The wonderful creamy, silky, chocolatey, hazelnut spread that is adored by chocolate lovers throughout the world! Me being me, I had to try my hand at making it at home! If it can be packaged, it can be made at home... much healthier. I altered this recipe a bit from Steph Chows blog. I added coconut oil to make it a bit silkier and to add a bit of nutritional punch!
Did you know -- Coconut oil improves digestion, strengthens the immune system, and protects against bacterial, viral, and fungal infections.
(You can tell in the image that it's a little bit chunkier than I had wanted. My blender burned out a couple weeks ago making homemade gyro's :( I used my mini food processor which did the best it possibly could.. I think I can, I think I can, I think I can... LOL!)


Ingredients:
  • 1/2 cup raw hazelnuts
  • 2 tbs cocoa powder
  • 3 tbs real maple syrup
  • 2 tsp vanilla extract
  • 1 tbs coconut oil
Method:
  1. Roast hazelnuts in a 350 degree oven for 10 minutes.


  2. Remove the skins by rubbing them with your hands.


  3. Blend the hazelnuts in a food processor or blender until they form into a thick butter.
  4. Add the remaining ingredients and process until smooth.
  5. Put into a jar and refrigerate.
That's it! So easy!! Once you try your hand at homemade Nutella, you can use it to make Miranda's Nutella Brownies :)

Buen Provecho!!

Friday, August 21, 2009

Guest Post: Peach & Cherry Yogurt Popsicles Recipe

Peach & Cherry Yogurt Popsicles

First of all, I'd like to introduce myself.  I am Dara from Cookin' Canuck and would love to see you over at my blog.  I was honored when Miranda asked me to guest post while she is on vacation.  Even though I have never met Miranda face-to-face, I am pretty certain she is a wonderful mother who is dedicated to making her children feel loved.  How better to make your kids feel special than a homemade popsicle?  My kids had a great time helping me make these popsicles, though waiting for them to freeze was excruciating for them.  Ah yes, delayed gratification is tough to take.

This recipe was adapted from one that I found on The Thrifty Gourmet.  You could easily substitute any fresh or frozen fruits you have on hand.

First things first. Peeling a peach may seem like a tricky endeavor. Don't be fooled! It's a simple matter of blanching. Boil water in a medium saucepan. With a slotted spoon, lower two peaches into the water and leave them in there for 1 minute (no longer!)


Using a slotted spoon, lift the peaches out of the boiling water and immediately plunge them into a bowl of ice water to stop the cooking.


Once the peaches are cool enough to handle, peel off the skins.  They should just slip right off. Cool, huh?


Finely chop the peaches. You'll also need 1/2 cup of pitted and chopped fresh cherries.


In a medium saucepan, melt 2 tablespoons of butter and then add 2 tablespoons of brown sugar.


Once the brown sugar is melted, add the peaches, cherries, and 1/2 teaspoon of vanilla extract. Bring the mixture to a boil, then reduce the heat and simmer the mixture for 5 minutes, or until the fruit is soft. Cool to room temperature.

Add 1 cup whole milk plain yogurt to the fruit mixture and stir well.


Spoon the yogurt mixture into popsicle molds and put the tops on/sticks in. Freeze for about 4 hours.


Serve! I think Mickey Mouse would feel rather fancy if he knew that his popsicles were being served in a crystal bowl.


Peach & Cherry Yogurt Popsicles

2 peaches, peeled, pitted & finely chopped
1/2 cup pitted and chopped fresh cherries
2 tbsp butter
2 tbsp brown sugar
1/2 tsp vanilla extract
1 cup plain whole milk yogurt

In a medium saucepan, melt the butter and then the brown sugar.  Once the brown sugar is melted, add the peaches, cherries, and vanilla extract. Bring the mixture to a boil, then reduce the heat and simmer the mixture for 5 minutes, or until the fruit is soft. Cool to room temperature.

Add the plain yogurt to the fruit mixture and stir well.  Spoon the yogurt mixture into popsicle molds and put the tops on/sticks in. Freeze for about 4 hours.

Makes 6 popsicles.

Wednesday, August 19, 2009

Guest Post: Fun Fruit Kabobs!

Hey everybody...girlichef here! Miranda is still off enjoying her vacation, so you've got me today. When Miranda asked me to do a guest post, I knew that I wanted to make something fun and family friendly...because that is totally the vibe I get whenever I visit here. Since summer's bounty is banging down our doors right now, I wanted to put some of it to good use! Admittedly there are no pineapples growing in my yard...or anywhere near it (I'm in Indiana), but I had to add some...because they just scream summer to me! The great thing about these... ...is that there is no recipe, per se...just a process...open to change and interpretation. I mean, come on...everybody likes food on a stick- it's fun! These fruit kabobs are something fun to make if you have guests coming over...or pack them for a picnic...or just have all the fruit ready and set it out at a party (for kiddos or kiddos-at-heart) and let everybody join in the assembling fun! I chose to use pineapple, cantaloupe, honeydew, watermelon, strawberries and red grapes for my kabobs...but you can use whatever is seasonal or just the fruits you enjoy most when you make these. I love that each of these fruits is a different, bright color- makes them that much more visually appealing!
I'd like to begin by demonstrating the breaking down of a pineapple...because I have had so many people tell me that they are scared to mess with a whole pineapple...too hard to cut up without a pineapple corer/peeler. I want to break that myth...because I honestly think they're one of the easiest fruits to cut up! Simply grab a cutting board and make sure it is anchored well to your counter (pineapples are juicy...don't want it sliding all over the place). Cut off the top and bottom. With a large chef's knife, slice from top to bottom, just under the area where you see the "eyes" of the pineapple. Make your way around. Once all of that scary outer peel is removed, cut into 4 equal pieces from top to bottom, through the core. Next, look for the light yellow core in each quarter and simple slice it off. You will end up with 4 gorgeous pieces of pineapple. From here, you simply cut each piece into chunks, tidbits, spears, etc! Easy, right! If you need rings, that is a bit different. Before you peel it, cut it in half the short way, then plunge an apple corer through the center to remove the core, then peel each half the same way and slice into rings. Now we'll move onto the cantaloupe. You can just peel it and chunk it if you wish...but for added fun, grab your melon baller! The first thing I do is slice of a little piece of each end to make it easier for the cantaloupe to sit still (won't roll). Next, cut it in half. Scoop out the seeds with an ice cream scoop. I use the large end of the melon baller and make my way in a circle around the flesh of the melon, keeping each cut close to the next...for maximum yield. Once you've used up the first row, simply (using a sharp knife) cut that layer off of the melon...straight across...you'll end up with a holey slice. Start again on the next row and continue until it is all used up. You should get a couple of extra balls from the bottom center. And you definitely don't have to throw all the "extra" melon away...simply scoop it away from the outer rind and use it for smoothies...or something of the sort!Honeydew is the same process as the cantaloupe...The watermelon process is basically the same, too (use a seedless watermelon if you can)! The main difference is that a watermelon will yield more because you have that whole surface area! After you've balled the first layer, slice it off and repeat!I quartered or halved the strawberries, depending on their size.The grapes, I simply plucked from their stems. Look at all this gorgeous fruit...ready for threading onto skewers!With all this gorgeous fruit ready, the next thing I do is throw together a couple of easy "toppings". Because dipping food on sticks into things is extra fun!

Yogurt Dip
by girlichef


yogurt- plain or vanilla
honey
cinnamon or freshly grated nutmeg


Simply stir up the ingredients, to your taste!
Chipotle Lime Salt
by girlichef

large crystal sea salt
zest of a lime (I actually used the zest of 2 key limes here)
chipotle chili powder

Stir 'em up. That's it!
Thread all of your fruit onto bamboo skewers...this is where you can enlist help (probably willing help, actually) or simply set it out for party guests to assemble themselves. Put your dippers/toppers alongside the fruit and you've got some luscious summertime fun!
Thanks to Miranda for having me over to her place...and thanks to you guys for hangin' out with me for a bit! But you know this is not all you can do with all of this deliciousness you whipped up...head on over to visit me , I also made this right here....

Monday, August 17, 2009

Guest Post..Banana Bread


Hi guys! It's Leslie from The Hungry Housewife.
Miranda is off on vacation for 8 days! Lucky girl huh? She asked me to do a guest post for her so her blog wasn't lonely
I decided to revisit one of my most popular items, My banana bread. It made the food blog rounds a while back and it seemed everyone loved it. I know I do. And everyone always asks for the recipe. So if you haven't tried it before, I urge you to do so!!!


1/2 cup softened butter
1 cup sugar
2 cups ap flour
1 tsp salt
2 tsp baking powder
1/2 tsp baking soda
2 eggs
4 large nasty looking ripe bananas. smooshed up real good
1/3 cup buttermilk
3/4 to 1 cup toasted walnuts
1 Tbsp vanilla
1 cup coconut
1 cup blueberries + a handful for sprinkling on top
Preheat oven to 350 and use middle rack
Cream together butter and sugar with hand mixer or stand mixer. Add egg one at a time, mixing well in between each addition.
In a separate bowl whisk together flour, salt, baking pwdr and baking soda.
Slowly add the dry ingredients to the butter mixture, alternating with the buttermilk..(always start and end with the flour..why? I don't know, just cause that's what my mom told me to do!)
Add bananas, vanilla, nuts and coconut and stir until combined. Fold in blueberries.
Lightly grease TWO 8in x 3 3/4in x 2 1/2in pans( I use the Hefty EZ elegance pans)
Pour the batter into both pans evenly. Sprinkle some blueberries on top for a garnish.
Bake for 45-55 minutes or until toothpick comes out of the center with only slight crumbs on it.
Try to let it cool before cutting into it..but I can never wait that long before digging in and slathering some butter on it!
Tips***
To toast the walnuts, just place in large skillet over medium heat and cook until fragrant and lightly browned, stirring occasionally. Usually around 5 to 8 minutes.
I use the two smaller pans because I found that if you make one large loaf the bottom tends to burn before the middle is done. And besides 2 loafs is better than one.

Saturday, August 15, 2009

Guest Post: Sweet Potato Croquettes with Yogurt Sauce


Hi everyone! (*waving hand*) This is Jenn from Bread + Butter. When Miranda asked me to do a guest post, I couldn't refuse the invitation. I'm always happy to help out a fellow foodie. Besides, I love sharing recipes and other food tidbits with others. There's fun to be had all around, right? Anyway, on to this very delectable little appetizer, which I had for dinner recently. I give you my Sweet Potato Croquettes with Yogurt Sauce.

I had some extra mashed sweet potatoes left from when I baked some sweet potato biscuits, which you'll see this coming week on Bread + Butter. I figured I'd make something a little similar to those little patty cakes I did a while back. So I turned them into golf ball sized croquettes. I did omit the sugar from my original recipe and seasoned it with a little salt and mixed in some panko crumbs instead of coating it. I baked them in the oven for roughly 10-15 min. They retained their shape as well as color and they came out with a slight firm crust, but when you bite into them it was soft like mashed potatoes. This is also great to get kinds involved, too. Let them shape the mashed sweet potato into ball.

I made a simple yogurt sauce to go along with this. A friend of mine had made something similar when I had dinner with her and her husband recently. I really loved it so much that I was surprised as to how easy it was to make. It was basically Greek yogurt, chopped fresh parsley and a tiny bit ot water. Simple.

Yum yum!!


Sweet Potato Croquette with Yogurt Sauce

2-3 Cooked and Mashed Sweet Potato
1/2 c panko crumbs
salt
pepper

Yogurt Sauce:
2 Tbsp greek plain yogurt
2 Tbsp chopped parsley
1 tsp water

To cook the sweet potato:
Peel and cube the sweet potato. Put them into some boiling water and cook until tender. Drain and cool them down witn running cold water. Mash them in a bowl.


Preheat your oven to 375˚F

When the sweet potatoes are mashed, mix in the panko crumbs and season with a little salt.

Take 2 Tbsp of the mashed sweet potato and with your hands form into a ball.

Place them on parchment paper lined baking sheet and baked for 12-15 min.

While they bake, mix together the ingredients for the sauce and set aside until ready to serve.

Bon Appetit!!